
Golf Simulator for Beginners: What You Actually Need to Get Started (UK 2026)


You have been thinking about getting a golf simulator. Maybe you tried one at a friend's house, or you simply want to practise more than the British weather allows. So you searched online — and immediately drowned in launch monitors, enclosures, software subscriptions, projector specs, and forum debates about radar versus camera technology.
Take a breath. It is not as complicated as the internet makes it look.
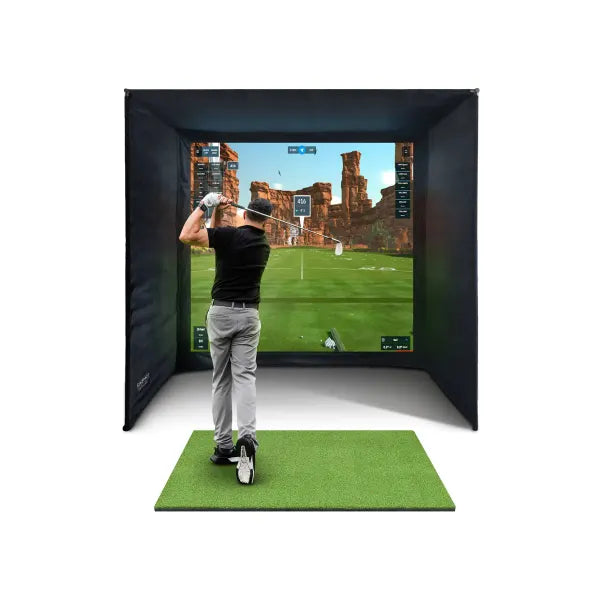
A home golf simulator is four things: something to hit off, something to hit into, something to measure your shot, and something to show you where the ball would have gone. That is it. Everything else comes later, if at all. This guide walks you from "I am interested" to "I am hitting balls" — no jargon without explanation, all prices in GBP, all measurements in metres with imperial in brackets.
If you want product comparisons at every budget, our complete buying guide covers that. If you need to check whether your room is big enough, the size and space planning guide has every measurement. This article is for the complete beginner who wants the full journey explained simply.
What Actually Makes Up a Golf Simulator?

A complete home simulator has six parts. Four are essential, two are optional upgrades.
The essentials
- Launch monitor — A small device (roughly the size of a hardback book) that measures what happens when you hit the ball: how fast it travels, its launch angle, spin, and where it would land. Think of it as a speed camera for golf balls. Radar-based monitors sit behind you; camera-based monitors sit beside the ball. Both work well.
- Enclosure and impact screen — A steel frame with a white screen at the front that catches the ball. The screen doubles as the surface your projector displays onto. Side panels contain mishits and block ambient light. Think of it as a sturdy tent frame with a screen at one end.
- Hitting mat — Artificial turf you stand on and hit from. Good mats feel like real fairway grass and absorb impact to protect your joints. Cheap mats feel like hitting off a car park.
- Software — An app that turns the launch monitor data into a visual experience: virtual courses, driving ranges with data overlays, or practice targets. Runs on a PC, laptop, or tablet.
The additions (not essential from day one)
- Projector — Displays the software image onto your impact screen at large scale. Without one, you view software on a PC monitor or tablet beside you, which works fine for practice.
- PC or gaming laptop — Most simulator software needs a Windows PC with a dedicated graphics card, though some (like Awesome Golf) run on iPad.
Why bundles simplify everything
A simulator bundle includes the launch monitor, enclosure, impact screen, and hitting mat — all tested and guaranteed to work together. You add the projector, PC, and software. This eliminates the most common beginner mistake: buying individual components that are incompatible, wrong-sized, or missing accessories.
For beginners, the FlightScope Mevo Gen 2 bundle from £2,498 is the most popular UK starting point. It includes the Mevo Gen 2 (16 data points, works indoors and outdoors), a SimSpace steel-frame enclosure with impact screen, and a hitting mat. We will use this bundle as our reference throughout because it is the best balance of quality, value, and simplicity.
Step 1: Measure Your Room
This is the step most beginners skip and the step that causes the most problems. Measure before you browse products, compare bundles, or set a budget.
Width: Measure wall to wall at the installation position. You need at least 3.3 metres (10 ft 10 in) — the smallest enclosure is 3.0 metres wide plus 15 cm clearance per side. Standard UK single garages are 2.7 to 3.3 metres wide; double garages at 5 to 5.5 metres fit any size.
Depth: Measure from the screen wall to the back wall. You need at least 4.5 metres (14 ft 9 in) for a camera-based monitor, or 5.5 metres (18 ft) for the Mevo Gen 2 (which sits 1.5 to 2.5 metres behind the ball). Most UK single garages are 5 to 6 metres deep.
Ceiling height: Measure floor to ceiling at your hitting spot. You need at least 2.5 metres (8 ft 2 in) for a full swing. Standard UK ceilings are 2.4 metres — tight but workable for golfers under 1.83 metres (6 ft) tall. Quick test: stand in the spot and make a slow full backswing with your longest club. If the club head comes within 10 cm of the ceiling, that space is too low for driver, but likely fine for irons.
For workarounds and detailed layouts, the size and space guide covers everything.
Step 2: Choose Your Bundle
With measurements in hand, the decision is straightforward.
Best value for beginners: FlightScope Mevo Gen 2 Bundle — From £2,498
The Mevo Gen 2 measures 16 data points, works indoors and outdoors, and comes with an E6 Connect software licence. It is far more than a beginner needs — which means you will never outgrow it. The bundle includes everything except the projector and PC. You need 5+ metres of room depth for the radar placement behind the ball.
Step up for compact rooms: Foresight GC3S Bundle — From £4,988
Camera-based, sits beside the ball, needs zero additional depth. If your room is under 5 metres deep, the GC3S fits where the Mevo Gen 2 cannot. It also delivers more precise spin data, making it a buy-once-never-replace proposition as your game improves.
For most beginners, the Mevo Gen 2 is the right choice. Full comparison of every option: buying guide.
Step 3: Prepare Your Space
While waiting for delivery (3 to 7 working days), get your room ready:
- Clear the area — full width and depth, floor to ceiling. Move stored items, bikes, and benches out of the installation zone.
- Check the floor — needs to be reasonably level. Most garage concrete is fine. Shim frame legs with plywood offcuts if there is a drainage slope.
- Check electrics — you need at least two sockets (projector + PC). A surge-protected extension lead works if sockets are limited.
- Consider lighting — projectors need a dark environment. Blackout blinds for windows; a garage with no windows is ideal. Our lighting guide covers this in detail.
- Optional: install the projector ceiling mount — position it 2.5 to 3 metres from the screen, centred. Universal mounts cost £30 to £80.
Step 4: Assemble Your Simulator (2-3 Hours, Two People)

The SimSpace enclosure bolts together with standard tools. No welding, no specialist equipment. You need two people, a socket set, a step ladder, and optionally a rubber mallet. Allow 2 to 3 hours for first-time assembly.
The process:
- Lay out all parts and match them to the instructions. 15 minutes of organisation saves confusion later.
- Build the base frame on the floor. Bolt corner joints and check it is square (both diagonal measurements should match).
- Raise the uprights — this is where you need the second person. Attach vertical posts and lift into position. Tighten enough to hold, not fully.
- Attach the top frame, then tighten all bolts fully. The frame should feel solid and not rock.
- Hang the impact screen with bungee cords or clips, starting from the top. Tension evenly — taut but with slight give for ball absorption.
- Attach the velour-lined side panels to contain stray shots and block light.
- Position the hitting mat so the ball sits 2.0 to 2.5 metres from the screen. Take a practice swing (no ball) to check alignment.
- Position the launch monitor — Mevo Gen 2: 1.5 to 2.5 metres directly behind the ball at ground level. GC3S: beside and slightly behind the ball, 20 to 30 cm to the right (right-handed golfer).
Physical build: done. For garage-specific tips including wiring and ventilation, see our garage installation guide.
Step 5: Connect and Play
Modern launch monitors are plug-and-play. The Mevo Gen 2 connects via Wi-Fi:
- Charge the device (USB cable, about 2 hours).
- Download the free FlightScope app (iOS or Android).
- Power on (hold the button 3 seconds), open the app, and follow the pairing guide.
- The app confirms correct positioning with an on-screen alignment tool.
Most people are connected and seeing shot data within 10 minutes.
Software: The Mevo Gen 2 includes an E6 Connect licence — polished, intuitive, and beginner-friendly. Install it on your PC, activate with your included code, select FlightScope as your monitor, choose a course, and play. When you are ready to explore alternatives, GSPro (around £200/year, 100,000+ community courses) is the UK favourite. Our software comparison covers every option.
Projector: Connect via HDMI, aim at the screen, adjust focus and keystone correction. No projector yet? Run the software on a PC monitor or laptop beside you — the data is just as useful. The projector adds immersion, not accuracy.
Your First Session: What to Expect

Everything is connected. You are standing on the mat with a club in your hands. Here is how to make this first session productive.
Start with a wedge, not a driver. Your first indoor swing should be a controlled half-swing with a pitching wedge. Hitting into a screen feels strange at first — the ball thuds and drops, with no flight to watch. A few gentle wedge shots let you adjust to the sensation and confirm the monitor is reading your shots. Once data appears consistently, work up through your bag.
The data will feel overwhelming — that is normal. Ball speed. Launch angle. Spin rate. Carry distance. Club speed. Smash factor. Sixteen numbers on every shot. Do not try to understand them all today.
For your first month, focus on two numbers only:
- Carry distance — how far the ball flies. Your 7-iron carries 130 yards? Now you know your actual 7-iron distance.
- Ball speed — how well you struck it. Higher ball speed with the same club means better contact.
Everything else becomes useful later. Right now, these two numbers give you everything you need.
Play a few holes for fun. Load a course in E6 Connect. Do not worry about score or data. Just enjoy the experience. This builds the habit of using your simulator regularly.
Keep it to 30-45 minutes. Indoor hitting is more tiring than it feels — harder surface, confined space, new sensory information. Stop while you still feel fresh. Better sessions come from ending before fatigue sets in.
Seven Beginner Mistakes (And How to Avoid Them)

1. Buying a standalone monitor without an enclosure
Someone buys a £500-£1,200 monitor, sets up a net, and within months is buying an enclosure anyway — spending more total than a bundle. Fix: Buy a bundle. If budget is truly tight, start with a practice net but know you are building toward a full setup.
2. Spending too much first time
Buying a £9,000 GC3 bundle before knowing whether you will use it three times a week. As a beginner, accuracy differences between the Mevo Gen 2 and premium monitors are irrelevant to your development. Fix: Start with the Mevo Gen 2 bundle. Upgrade after 6-12 months if you are practising consistently.
3. Not measuring the room properly
Ordering a 3.3-metre enclosure for a 3.2-metre garage. Or forgetting the boiler on the wall. Fix: Measure three times at the actual installation position. Check for obstructions: boilers, fuse boxes, pipes, garage door runners. When in doubt, go one enclosure size smaller.
4. Forgetting projector and PC budget
The bundle price is not the total price. A projector (£350-£800) and a PC (£600-£1,000, or free if you own one) need budgeting too. Fix: Set your total budget first, then work backwards. If total budget is £3,500: £2,498 on the bundle, £1,000 on projector and PC or tablet. Our cost breakdown covers every component.
5. Placing the monitor incorrectly
A radar monitor off-centre by 10 cm gives consistently wrong readings. Fix: Follow the manual exactly. Use a tape measure. Mark the position on the floor with tape so every session setup takes 30 seconds.
6. Analysing every data point from day one
Spending 20 minutes studying spin axis instead of hitting balls. Fix: Month 1: carry distance and ball speed only. Months 2-3: add direction. Months 3-6: add spin rate. Month 6+: launch angle, club path, face angle.
7. Practising without structure
Random balls at random targets gets boring after a week. Fix: Every session gets a written goal: "Hit 20 seven-irons and track average carry" or "Play 9 holes keeping every drive in play." A session with purpose is ten times more productive.
Your First Six Months: A Progression Plan
Month 1 — Learn your distances. Hit every club at least 20 times, record average carry. Most beginners discover their real distances are 10-20 yards shorter than they thought. This is the most valuable information you can have for course decisions.
Month 2 — Build consistency. Not hitting further — reducing the spread. If your 7-iron ranges from 115 to 145 yards, work on tightening it to 125-140. Hit 30 balls with the same club each session and watch the window narrow.
Month 3 — Track accuracy. Pay attention to left-right dispersion. Set a target (within 10 yards of centre) and track your hit percentage.
Months 4-5 — Spin awareness. Now spin rate becomes meaningful. High spin stops the ball on greens (good for irons); low spin adds roll (good off the tee). Understanding how your spin numbers relate to on-course results is powerful.
Month 6 — Review and expand. Revisit your baseline distances. Most golfers see 5-15 yards more carry, tighter dispersion, and better consistency. Now start exploring launch angle, angle of attack, and shot shape. These were meaningless at month one. At month six, they tell you things you can act on.
By six months, most beginners say the same thing: "I do not know how I ever practised without this."
Frequently Asked Questions
Is a golf simulator worth it for a complete beginner?
Beginners arguably benefit more than any other group. Shot data plus unlimited repetition in a zero-pressure environment accelerates improvement far beyond weekly range visits. Three 20-minute sessions per week for six months produces significant, measurable progress.
How long does it take to set up?
Physical assembly: 2-3 hours with two people. Electronics: 30-60 minutes. Most people go from delivery boxes to first shots in a single afternoon.
Do I need a PC?
For full simulator software (GSPro, E6 Connect), yes — a Windows PC with a dedicated graphics card. But you can start without one: the FlightScope app gives full shot data on any phone or tablet, and Awesome Golf runs on iPad. Add a PC later. Our indoor simulator guide covers all options.
What is the easiest simulator software?
E6 Connect — polished, intuitive, near-zero learning curve. Included free with the Mevo Gen 2. Most golfers later explore GSPro for its vast course library.
Can I install one in a rented property?
Yes. SimSpace enclosures are freestanding — no wall, floor, or ceiling attachments. A ceiling-mounted projector leaves four small screw holes, easily filled. The entire setup disassembles and moves in an afternoon.
What should I budget in total?
Realistic totals: £3,000-£3,500 (Mevo Gen 2 bundle + budget projector + existing PC); £4,000-£5,000 (new PC + mid-range projector); £5,500-£7,000 (GC3S bundle + premium peripherals). Full breakdown: UK cost guide.
Getting Started Is Simpler Than You Think
The golf simulator industry has a complexity problem. Forums and YouTube make it sound like you need a degree in sports science. You do not. Here is the entire path:
- Measure your room — width, depth, ceiling height at the hitting position
- Choose a bundle — the Mevo Gen 2 at £2,498 for most beginners, or the GC3S at £4,988 for compact rooms
- Prepare the space — clear the room, check sockets, consider lighting
- Assemble — two people, 2-3 hours, no specialist tools
- Connect — charge the monitor, download the app, pair, play
- Hit balls — start with wedges, focus on carry distance and ball speed
- Keep hitting balls — three sessions a week, 20-30 minutes, with a goal every time
Six months from now, you will have real data on every club in your bag, a more consistent swing, and a practice setup that works regardless of rain, darkness, or January.
Browse the full bundle collection or start with our recommended beginner choice: the FlightScope Mevo Gen 2 bundle. Every bundle ships across the UK with all components included.


Leave a comment