
How to Build a Base for a Garden Golf Cage (UK): Grass, Platform or Sub-Base?
The question we get asked more than any other on WhatsApp isn't about the cage — it's about the ground underneath it. Should a garden golf cage go straight onto grass? Onto a raised platform? Or onto a properly built sub-base? After designing hundreds of home setups (and hitting balls from our own garden cage most days), here's the honest, complete answer — including the one option we routinely talk customers out of.
The short version
| Base option | Cost | Winter use | Cage height vs garden | Verdict |
|---|---|---|---|---|
| Straight onto grass (U-pegs) | £0 | Muddy by late autumn | 3.0m | The right way to start |
| Raised platform / deck | £££ | Good | 3.3m+ — taller | Think twice |
| Prepared sub-base (MOT Type 1) | ££ | Perfect — free-draining | ~2.93m — frame beds in | The right way to finish |
Option 1: Straight onto grass — the right day one
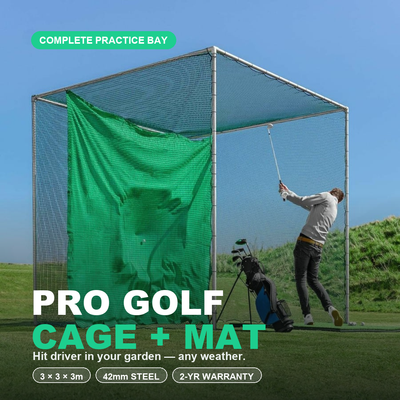
A freestanding cage like our Pro Golf Cage & Hitting Mat Bundle anchors with U-pegs straight into the lawn — no concrete, no fixings, hitting balls within the hour. For a summer start this is genuinely fine, and it has one under-rated advantage: you can reposition the cage while you learn how your garden plays (sun, wind, what the neighbours can see) before committing to groundwork.
The honest downside is winter. A well-used bay concentrates hundreds of footsteps on the same square metres, and from late autumn most UK lawns turn to mud there. You won't damage the cage — you'll just stop enjoying the sessions. Judge any base against February, not July: it's rarely the cage that stops winter practice, it's the swamp forming where you stand. The mat stays fine; the approach to it doesn't. A single line of rubber walkway tiles from the house to the mat fixes 80% of it for about £40 — the tip we give every grass-base customer at handover.
Verdict: start here if the landscaper is weeks out or you want to test the position. The cage simply lifts onto a finished base later — nothing about it changes.
Option 2: The raised platform — the one we talk people out of
A timber deck or platform solves the mud problem, which is why it feels intuitive. But it has a flaw nothing else on this page has: it's the only option that makes your cage taller. By the time joists and decking go down you've added 30cm or more — so a 3m cage now stands at 3.3m+ against your fence or hedge line. If neighbour sightlines matter to you at all (they're one of the most common concerns we hear), a platform works directly against you. The materials bill usually lands close to a proper sub-base anyway.
Verdict: only worth considering where the ground falls away so steeply that levelling soil isn't practical.
The renter's exception: a platform under the mat only
One hybrid we've specced for several renting customers is worth knowing: grass and U-pegs for the cage itself, plus a small 2m × 2m raised platform only under the mat and stance. It costs about £120 in timber, keeps the strike surface level and dry all winter, adds no visible height to the cage line — and the whole setup lifts out when the tenancy ends. You keep the 90-minute reversibility of the grass option and lose the February swamp.
Option 3: The prepared sub-base — what we recommend
This is the build we describe to customers week in, week out, and it's what any competent local landscaper can quote from a one-page spec. It's the same construction used under artificial lawns and patios, so it's a routine job — nothing about a golf cage makes it special:
- Excavate the bay area to 75–100mm and remove the spoil. For a typical 3m × 4m bay that's just under a cubic metre — plan for a skip bag and a half.
- Lay a permeable weed membrane (geotextile) over the exposed soil, overlapping any joins by at least 100mm. It stops weeds coming up through the finished surface and keeps the stone layer from slowly pressing into the soil below. Don't use an impermeable sheet — the whole point of this base is that water passes straight through it.
- Compacted MOT Type 1 — the crushed-stone sub-base used under driveways — at 50–75mm depth, compacted hard with a wacker plate (about £40 a day to hire) in at least two passes. This layer is why the bay drains freely and never turns to mud. Type 2 also works for a foot-traffic-only practice bay; Type 1 is the standard spec any landscaper will recognise.
- Sharp sand blinding, a 10–15mm layer compacted and levelled dead flat. This fills the surface of the stone and gives the finish a smooth bed.
- Edge the bay with treated timber or composite edging boards, pegged on the outside. Edging keeps the finished surface contained — it's what stops bark migrating onto the lawn and gives artificial turf a clean line to be trimmed and fixed against.
- Finish flush with the lawn in artificial turf (a putting-green surface with cups is a popular upgrade) or bark on a budget — bark can be swapped for turf later without touching the base.
The cage frame beds roughly 75mm into the finished surface, which does three things: locks the frame dead level and rock solid all year, keeps the bay draining through the stone below, and sits the whole cage a whisker lower than it stands on grass.
One thing we'll say plainly, because nobody else selling cages seems to: no base makes a 3m cage meaningfully lower. The cage needs its height — a driver swings a bigger arc than feels intuitive, and 3m is the margin that lets you swing without a single thought. The base's real jobs are drainage, stability, and never making the cage taller than it has to be. Dark green netting does the rest: against planting it reads as shadow, not structure.
The shopping list, sized for one bay
For a 3m × 4m bay dug to 75mm, this is the whole materials run: a roll of permeable weed membrane (a 4.5m × 4m offcut covers it with overlap), roughly a bulk bag and a half of MOT Type 1 (order two — a compacted layer takes more stone than the loose volume suggests), 4–5 bags of sharp sand for the blinding, 14 linear metres of treated timber edging with pegs, and your finish — 12m² of artificial turf or 3–4 bulk bags of bark. Tools: spade and mattock for the dig, rake, spirit level on a straight edge, and the hired wacker plate. Everything on that list comes from any builders' merchant; nothing is specialist.
Our own build, with the real numbers
Because "hire a landscaper" is easy advice to give and hard to budget for, here's exactly what our own base involved. We measured the footprint at 3m × 4m to run turf behind the hitting area, and dug out 75mm — shallow enough to hand-dig in a long day, deep enough for a proper sub-base. That works out at just under a cubic metre of spoil (plan for it: it filled a builder's skip bag and a half). In went compacted MOT Type 1, blinded with sharp sand, wacker-plated in two passes, then artificial turf on top. Total materials came in under £300; the landscaper quote for the same job was £450–£600 of labour, which is fair if you'd rather not do the digging. Two seasons on, we tested it after a week of storms: no standing water, no settlement, the mat still dead level. The technique is standard sub-base practice — Paving Expert's sub-base guide is the reference we used and still recommend.
Around the base: bark or artificial turf both work
The question that follows the build itself: what goes on top, and what surrounds the cage where you stand, walk in, and collect balls? The answer is that either bark or artificial turf can be used around the base — they sit on exactly the same sub-base, so this is a finish decision, not a construction one, and you can start with one and change to the other later without touching the groundwork.
Bark is the budget finish: £60–£90 covers a bay in play-grade chippings, it looks soft and natural against planting, and it goes down in an hour with no skill involved. Its honest weaknesses in a UK garden: it decomposes and thins, so high-traffic spots want topping up roughly annually; it holds moisture in shaded corners; and loose chippings migrate — which is why the timber edging in the build above earns its place. Use play-grade bark rather than ornamental mulch: it's graded to stay put and drain, and it's kinder underfoot.
Artificial turf costs more up front (£15–£30/m² for decent garden grades) but is the finish that makes the bay look designed-in rather than dropped-in: green year-round, draining straight through to the stone below, with nothing to top up — an occasional stiff-brush to keep the pile standing is the whole maintenance schedule. It also plays better: balls sit on it like fairway, so chipping around the cage becomes practice rather than ball-hunting, and a putting-green grade with a couple of cups turns the surround into a short-game area.
The pattern we see most often, and the one we'd recommend: bark in year one while the budget recovers from the cage itself, turf when you're sure of the position. Plenty of customers also mix them — turf under the mat, stance and walk-in line, bark around the back and sides of the cage where nobody stands. Both read as intentional; mud reads as a building site.
Anchoring, surface by surface
However the base is finished, the cage has to be fixed to it, and the right method depends on what's underneath:
- Grass: the supplied U-pegs straight into the lawn. Push-fit, done in minutes, and strong enough for year-round UK weather at 3m cage height.
- Prepared sub-base: the frame beds into the finished surface and pegs drive through the turf or bark into the compacted stone — the most solid fixing of all. On the socketed cage, the four ground sockets are set into the sub-base during the build for a truly permanent install.
- Patio, concrete or decking: anchor plates screwed to the surface instead of pegs. On a paved area you can also weight the base rails if you'd rather not drill.
- Exposed, windy gardens: whatever the surface, upgrade corner fixings to screw-in ground anchors and check tension after the first storm of the season — netting catches surprisingly little wind, but a loose corner peg works itself looser.
The decision in four questions
Renting or might move the cage? Grass and pegs (with the mat-only platform if you practise through winter). Wet, clay-heavy garden? A prepared sub-base — standing water ends winter practice. Neighbour sightlines tight? Sub-base or grass, never a full platform. Want it to look designed-in? Sub-base, no contest. Whichever you choose, get the surface level before the cage goes up — everything else in your practice sits on that. Step-by-step assembly: How to Set Up a Golf Cage in Your Garden.
Siting tips that save a season of annoyance
- Stay clear of overhanging trees. Netting collects leaves, sap and falling twigs — a metre of clearance saves you a seasonal chore and years of net life.
- Check the ball flight line, not just the cage footprint. You stand outside the cage mouth to hit into it — allow standing room on the finished surface too, which is why we spec bays at 3m × 4m rather than the cage's 3m × 3m footprint.
- Favour level ground with natural drainage. A spot that puddles after rain will puddle worse once feet compact it — the sub-base fixes this anywhere, but on grass-only setups it decides where the cage should go.
- Think about the filming angle. Most improving golfers end up recording their swing; leave room for a tripod where it can see the whole arc.
What does the groundwork cost?
Side by side, for a single bay: grass and U-pegs — £0 and about 90 minutes, works today. Raised platform — £250–£500 in timber as a DIY weekend job, and it adds 20–30cm of height. Prepared sub-base — £250–£350 in materials plus a day of digging if you do it yourself, or roughly £450–£700 of labour landscaped (regional rates vary). It's a routine job for any landscaper who builds patios or artificial lawns, and we supply a one-page base specification with every cage order so yours can quote it sight unseen — you pay them directly, no markup hiding in the middle. All three options take the same cage: you can start on grass this weekend and upgrade the base next spring without buying anything twice.
Which cage does this apply to?
All of ours — the build is identical whether you're on the heavy-duty 42mm Pro bundle, the socketed version (which sets its four sockets into the prepared base for the most permanent install of all), or a standard 34mm cage. If you're not sure which cage suits your garden in the first place, our cage comparison guide walks through it.
FAQ
Can I put a golf cage on a patio or concrete? Yes — freestanding cages stand happily on any hard, level surface, with anchor plates instead of U-pegs. You'll want the hitting mat's rubber base for shock absorption.
Do I need planning permission? For a domestic garden cage under 4m, generally no in the UK — but if you're near a boundary and unsure, a friendly word with the neighbour beats a formal complaint later.
How long does the groundwork take? Typically a one-to-two-day job for a single bay, and the cage can be delivered and standing on grass while you wait — then lifted on when the base cures.
What about drainage — does it need a fall? A compacted MOT Type 1 base drains vertically; a deliberate fall isn't usually needed for a practice bay. Your landscaper will judge it against your soil.
Do I need a weed membrane? Under a prepared base, yes — a permeable geotextile stops weeds and keeps the stone from working into the soil, and it costs a few pounds. Never use plastic sheeting: it traps water and defeats the free-draining build.
How big should the base be? Bigger than the cage. The cage occupies 3m × 3m, but you stand at the mouth to hit into it — 3m × 4m is our standard spec so the stance and walk-in line share the finished surface.
What should go around the base of the cage? Bark or artificial turf — both work, on the same sub-base. Bark is cheapest and natural-looking but wants an annual top-up; turf costs more, drains through, needs almost nothing and doubles as a chipping surface. Many customers run turf where they stand and bark behind the cage.
Can I use my existing artificial lawn? If it was laid on a compacted sub-base, yes — peg through it and you're done. If it was laid straight onto soil or sand (common with budget installs), expect the cage feet to settle unevenly; check firmness before relying on it.
Can a golf cage go on a raised deck? Yes — pegs fix into timber. Just remember it raises the cage 20–30cm, which affects how visible it is over fences and hedges.
How level does the base need to be? Aim for within 10–15mm across the mat area. The cage frame tolerates more, but a tilted mat quietly trains a tilted swing — check with a spirit level on a straight edge before anchoring.
What's the cheapest base that actually works? Grass with U-pegs, genuinely free. Its winter weakness is the muddy stance path, which about £40 of rubber walkway tiles fixes — the upgrade we recommend to every grass-base customer.
⛳ Free resource: the 90-Day Golf Cage Practice Programme
A cage stops your golf balls — a plan lowers your scores. The free interactive golf cage practice programme gives you 39 structured 25-minute sessions, a 24-drill library, and progress scorecards you can track online — built around the Pro Golf Cage & Hitting Mat Bundle and open to every garden golfer.
Free email series: Dream Home Golf Cage Setup
Six short emails from Tom on the five decisions behind a brilliant garden practice space.
📏 Free tool: the Garden Golf Cage Planner
Planning a garden golf cage? The free Garden Golf Cage Planner answers the space, base, netting and cost questions in one place — including the Will-It-Fit calculator: enter your garden size and see which cages fit. No sign-up.
Not sure what fits your garden?
Send me a photo of your garden with rough measurements on WhatsApp and I’ll design your setup with you — free, no obligation. Chat with Tom on WhatsApp →

Free Home Golf Cage Setup Design Consultation
Not sure on size, base or mat? Chat directly with Tom, OpenGolfer’s founder — he practises from his own garden cage most days and has designed hundreds of home setups.
- Send a photo of your garden with rough measurements — get a tailored layout and spec for your space
- Personal replies from a real golfer, not a call centre
- Honest advice on what to buy — and what not to
Usually replies within the hour, 8am–8pm · prefer to talk? 02033 768500


Leave a comment